The wiring in a lot of older homes is genuinely dangerous — not in a dramatic, sparks-flying way, but in the slow, invisible way that leads to a tripped breaker every time someone runs a toaster and a microwave at the same time, or worse, insulation that’s brittled out and is quietly running hot inside a wall cavity. Ignore it long enough and you’re looking at either a fire or a complete re-do forced by an insurance inspection, which is a much more expensive and disruptive version of the same job you were avoiding. A full professional rewire on a 1,500 sq ft house in the US typically runs somewhere between $8,000 and $15,000 depending on local labor rates, wall construction, and how much of the existing infrastructure can be reused — and that number stings enough that most homeowners start wondering how much of this they can legally, safely do themselves.
How much of a rewire you can do yourself depends almost entirely on where you live. In most US states, homeowners can pull their own permits and perform wiring work on their primary residence, provided inspections pass. The UK’s Part P restricts kitchen, bathroom, and outdoor circuits to certified tradespeople or notified DIYers. Australia prohibits all fixed wiring DIY, full stop. Even where it’s legal, the scope that’s genuinely safe to self-perform is narrower than most online guides admit.
What makes this question harder than it looks is that the legal answer and the practical answer don’t always land in the same place. You might be perfectly entitled to rough-in a new 20 A kitchen circuit yourself — but if you’ve never held a fish tape or pulled 12 AWG through a 40-year-old wall full of fire blocking and insulation, the gap between “permitted” and “done correctly” is where real problems live. The material choices alone — correct gauge, right cable type, proper box fill — carry consequences that won’t show up until something fails.
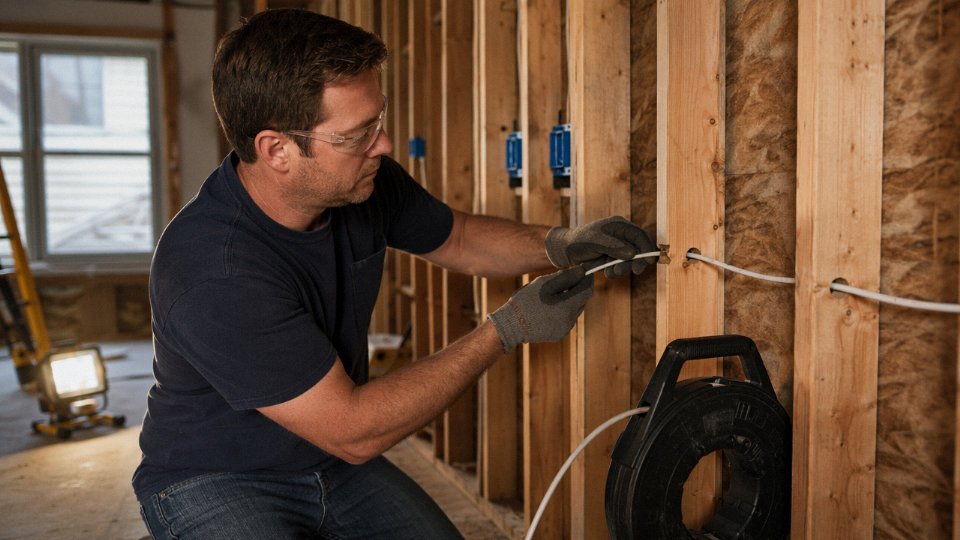
Legal Boundaries by Jurisdiction: What Homeowners Are Actually Permitted to Wire
The single most common mistake DIYers make isn’t a wiring error — it’s assuming their neighbor’s legal DIY project is also legal for them. Electrical codes and licensing requirements vary dramatically by country, state, and even municipality, and the consequences of getting this wrong range from a failed inspection to voided homeowner’s insurance to criminal liability after a fire.
United States: Permitted, But Not Unconditional
Most US states allow owner-occupants to perform electrical work on their primary residence, provided they pull a permit and pass inspection. That “owner-occupant” qualifier matters more than people realize. You cannot legally do this work on a rental property you own in the vast majority of jurisdictions — even if you’re technically a licensed handyman. Landlords doing their own electrical work on occupied rentals are operating in genuinely risky legal territory in most states.
A few states tighten the rules further. Oregon requires homeowners to certify they will occupy the dwelling for at least 12 months after completing the work, and some Oregon counties have added local requirements on top of that. California’s statewide code permits homeowner work, but local amendments in cities like Los Angeles and San Francisco have historically layered on additional restrictions — worth verifying with the specific AHJ (Authority Having Jurisdiction) before you buy wire. Hawaii restricts most electrical work to licensed contractors regardless of owner-occupancy status; it’s one of the strictest states in the country on this point.
The permit and inspection process is the framework, not an obstacle. An inspector catching a reversed neutral or an undersized conductor before drywall goes up is exactly the system working correctly.
In most US states, homeowners can legally rewire their own primary residence without a licensed electrician, provided they obtain a permit and pass inspection.True
This is accurate for the majority of US states under owner-builder exemptions, though specific conditions (occupancy requirements, local amendments, rental property exclusions) vary by jurisdiction and should always be verified with the local AHJ before beginning work.
United Kingdom: Part P Is More Nuanced Than Most People Think
Part P of the Building Regulations (England and Wales) divides electrical work into notifiable and non-notifiable categories, and the line between them trips up a lot of competent DIYers. Swapping a like-for-like socket or light switch in a dry, non-special location — say, a living room — is generally non-notifiable. You can do it legally without telling anyone.
The moment you cross into a kitchen, bathroom, or outdoor location, or you’re adding a new circuit, replacing a consumer unit, or installing anything in a shower room, the work becomes notifiable. That means either hiring a Part P registered electrician (who self-certifies the work) or submitting a building notice to your local authority before starting and paying for the council to inspect it afterward. The building notice route is legal and underused — it’s roughly £200–£500 depending on the council, in my experience — but most DIYers don’t know it exists. Scotland and Northern Ireland operate under separate but broadly similar regulations.
Australia and New Zealand: The Answer Is Simply No
There is no homeowner exemption for fixed wiring work in any Australian state or territory. Full stop. Whether you’re in Queensland, Victoria, or Western Australia, connecting, modifying, or installing fixed electrical wiring requires a licensed electrician. You can change a light bulb, replace a plug-in appliance, and reset a circuit breaker. That’s roughly where the legal boundary sits for an unlicensed person.
New Zealand takes a similar position under the Electricity Act; “prescribed electrical work” is restricted to licensed practitioners. Homeowners can do minor low-voltage work on ELV systems in some interpretations, but fixed 230 V wiring is not in scope.
Canada and the EU: Provincial Patchwork and Standards Frameworks
Canada runs on provincial jurisdiction, so the rules vary considerably. British Columbia and Ontario both allow homeowner electrical work under a homeowner permit system, with mandatory inspections. Quebec is considerably more restrictive, generally requiring licensed electricians. Alberta sits somewhere in the middle — homeowners can do work in their own single-family dwellings under permit, but the inspection requirements are stringent.
EU member states generally adopt IEC 60364 as the basis for low-voltage installation standards, but enforcement and licensing requirements are set nationally. Germany, for instance, requires that connection to the public grid be performed by a licensed installer (Elektrofachkraft). France similarly restricts fixed installation work, though the homeowner doing internal wiring for their own use occupies a legal gray area in practice. The practical takeaway for EU projects: verify with the local utility and building authority before starting, because the “harmless DIY” assumption from US practice does not transfer cleanly.
Quick-Reference Permission Matrix
| Task | US (typical) | UK (England) | Australia | Canada (BC/ON) |
|---|---|---|---|---|
| Replace outlet/switch, dry room | Permit required | Non-notifiable, DIY OK | Licensed only | Permit required |
| Add new branch circuit | Permit required | Notifiable — Part P reg. or building notice | Licensed only | Permit required |
| Kitchen/bathroom wiring | Permit required | Notifiable | Licensed only | Permit required |
| Consumer unit / panel work | Permit required | Notifiable | Licensed only | Permit required |
| Rental property (owner doing work) | Restricted/prohibited in most states | Subject to same rules | Licensed only | Generally prohibited |
| Whole-house rewire | Permit required, owner-occupant | Notifiable throughout | Licensed only | Permit required |
Before buying a single roll of 12 AWG NM-B, confirm your jurisdiction’s specific rules with the local building department or electrical authority. Regulations update, local amendments exist, and an inspector who hasn’t seen your permit yet is not a safety net you want to rely on.
Risk Assessment Before You Touch a Wire: Shock, Arc-Flash, and Fire Hazards Specific to Rewiring Work
Most electrical injuries don’t happen because someone was careless. They happen because the person didn’t fully understand what was still energized, and why.
Rewiring tasks span an enormous range of actual danger. Swapping an outlet on a tripped breaker with a verified dead circuit is genuinely low-risk work. Opening a panel while the main breaker is “off” is a different situation entirely — and that distinction is where non-qualified people get hurt.
Shock Risk Is Not Uniform Across the Panel
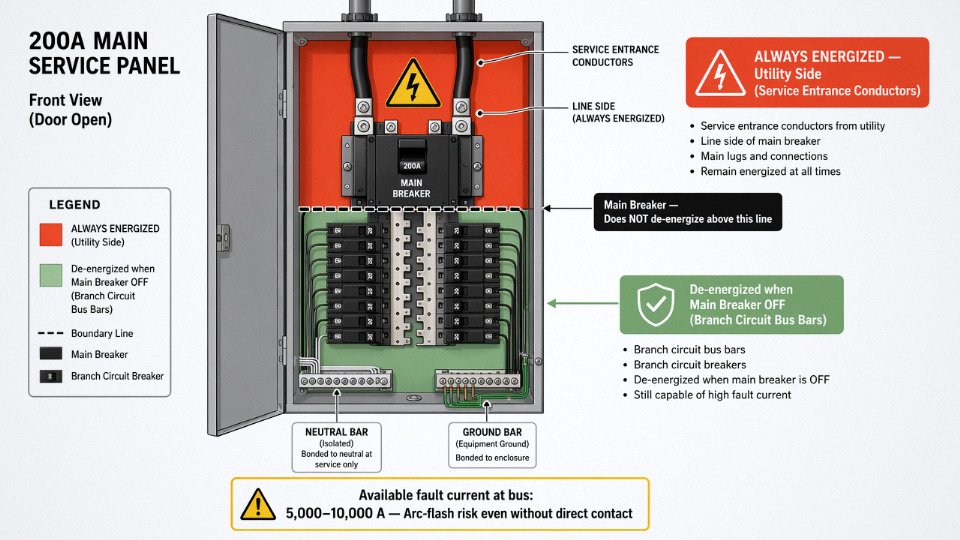
Branch circuit conductors at 120 V or 240 V will cause ventricular fibrillation at currents well below 100 mA through the chest. That’s the fundamental danger of any live conductor contact. But the shock hazard at the service entrance — the large cables feeding the top of your main panel from the utility — is categorically worse, and it does not go away when you flip the main breaker.
The main breaker disconnects everything downstream of it. The service entrance conductors above it remain live at all times. Only the utility company can de-energize them, typically by pulling the meter or cutting the drop. Many homeowners don’t know this. Some electricians forget to communicate it clearly. The result is that panel work, specifically anything near the top third of a 200 A service panel, carries a risk level that PPE and procedure can mitigate but never fully eliminate for an untrained person working alone.
The main circuit breaker de-energizes the entire electrical panel, including the service entrance conductors.False
The main breaker only disconnects the load side (bus bars and branch circuits). The service entrance conductors above the main breaker remain energized at utility voltage regardless of breaker position. Only the utility can de-energize them by removing the meter or disconnecting the service drop.
Arc-Flash: The Hazard That Doesn’t Require Direct Touch
Shock requires physical contact with a live conductor. Arc-flash doesn’t. A residential 200 A panel fed from a typical utility transformer carries enough available fault current — often 5,000 to 10,000 A depending on transformer size and service length — that an accidental short across the bus bars can release incident energy in the range of 1–4 cal/cm² at typical working distances inside the enclosure. That may sound abstract. At roughly 1.2 cal/cm², exposed skin begins to sustain a second-degree burn. A dropped screwdriver, a wire end that springs loose, a moment of misalignment — any of these can initiate an arc event measured in milliseconds that causes severe facial burns before a person can react.
Arc-rated PPE — minimum arc rating of 4 cal/cm² for residential panels, a full face shield, arc-rated gloves rated at least Class 00, and long sleeves — is the engineering control for this hazard. In practice, most DIY rewiring projects involve none of this equipment.
Fire Risk Doesn’t Announce Itself
The NFPA reports roughly 46,700 home structure fires per year in the US attributable to electrical failures or faults, with wiring and related equipment consistently among the leading ignition sources.
What makes electrical fire risk insidious is the timeline. A bad splice inside a junction box — wire nut installed with one conductor slightly missed, wrapped with electrical tape and tucked away — may pass a visual inspection, carry normal load for months, and then arc intermittently when the connection oxidizes or vibrates loose. Same story with an undersized conductor: 14 AWG wire feeding a 20 A breaker instead of the required 12 AWG will carry the load without tripping until thermal degradation of the insulation reaches a critical point, often inside a wall cavity where nobody sees it.
Breaker sizing is the other failure mode that causes fires. A 20 A breaker protects the wiring, not the appliance. Installing an oversized breaker to stop nuisance trips is one of the more reliably dangerous shortcuts in residential electrical work.
Insulation Quality and Conductor Integrity as Long-Term Variables
Cable quality matters more than most homeowners realize, and it shows up years after installation. Residential NM-B cable installed in the US must meet UL 719; equivalent products for international markets include IEC 60227 and BS 6004. These standards specify insulation temperature ratings, typically 60°C or 90°C, conductor strand integrity, and minimum dielectric strength — parameters that determine how the cable behaves over a 30- to 40-year service life, not just on day one.
Cable sourced from unverified suppliers — particularly gray-market imports with counterfeit UL markings — occasionally shows reduced copper cross-section, poor strand twist, or insulation compounds that don’t meet the rated temperature class. In a wall cavity running near a recessed fixture, or in an attic space that routinely hits 50–60°C in summer, that difference matters. Sourcing cable from a manufacturer that maintains verifiable third-party certification — IEC, UL, or BS as applicable — is not a premium upgrade. It’s baseline risk management.
Lockout/Tagout for Home Rewiring: Simple but Non-Negotiable
Industrial LOTO procedures translate directly to residential work, just without the paperwork. The sequence is: identify the circuit, open the breaker, apply a breaker lock or at minimum a piece of tape and a note, then verify dead at the work location with a non-contact voltage tester — twice, once before touching anything, once after. Then confirm with a true-RMS multimeter measuring L-N and L-G.
The non-contact tester alone isn’t sufficient. These devices can false-negative on certain cable configurations, particularly when a neutral and a hot are closely bundled. The multimeter reading confirms what the NCV tester suggests.
Never assume a circuit is dead because a room has no power. Shared neutral conductors, multi-wire branch circuits, and miswired panels all create scenarios where a conductor at a de-energized outlet can still be live. Verify at the actual point of work, every time.
Task-by-Task DIY Feasibility Guide: From Outlet Replacement to New Circuit Runs
Not all wiring work carries the same risk profile, and treating it as a single category is how people either get hurt or spend money on a professional for something they could have handled themselves on a Saturday morning. Here’s a realistic breakdown — tiered by actual complexity, not just perceived danger.
Tier 1 — Beginner-Capable, Widely Permitted
Replacing a standard outlet or switch like-for-like is about as close to zero-risk electrical work as exists, assuming you kill power at the breaker and verify it with a non-contact tester before touching anything. Swapping a two-prong ungrounded outlet for a GFCI receptacle on an old ungrounded circuit is also squarely in this tier — it’s code-compliant, doesn’t require a ground wire to function, and the GFCI mechanism protects the circuit regardless.
The failure points here are almost always procedural, not conceptual. Backstab (push-in) connections on cheap outlets are the leading culprit for loose connections and intermittent failures — always use the screw terminals, wrapped clockwise so the screw tightens the wire as you torque it down. Reversed polarity (hot and neutral swapped) is the other classic beginner error; a simple outlet tester from any hardware store catches it instantly after the fact, but checking your wiring diagram before you close the box is faster. Installing a ceiling fan on an existing ceiling box is fine as long as the box is fan-rated — a standard pancake box is not, and the oscillating load will eventually pull it out of the ceiling if you ignore that detail.
Time estimate: 20–45 minutes per device, including breaker lockout and testing.
Tier 2 — Competent DIYer, Permit Required in Most Areas
This is where the work gets meaningfully more involved. Adding an outlet by extending an existing circuit means opening walls, routing cable, and making decisions about box fill — the NEC limits how many conductors can occupy a given box volume, and ignoring that calculation is a code violation that an inspector will flag. Running a new 20 A kitchen circuit in conduit requires choosing the right conduit type (EMT is standard in exposed areas, ENT in concealed), pulling wire without nicking the insulation, and landing it correctly at the panel.
12 AWG wire is required for all 20 A circuits under the NEC.True
NEC 210.19(A) requires conductors sized to the circuit's overcurrent protection; a 20 A breaker requires a minimum 12 AWG copper conductor, making 14 AWG a code violation on that circuit regardless of actual load.
Installing a 240 V dryer outlet (NEMA 14-30) involves a four-wire run — two hots, a neutral, and a ground — and most mistakes happen at the panel end, where people confuse the neutral bar and the ground bar in a main panel (they’re bonded there, but the distinction matters in subpanels). Cable fishing through finished walls is a real skill: a good fish tape, a stud finder, and patience save hours. Cutting a chase in the wrong place means patching drywall.
Tier 3 — Experienced DIYer, Permit Required
Partially rewiring a room, installing a garage subpanel, or running a new circuit from the main panel puts you in territory where errors compound. Cable sizing for long runs isn’t just about ampacity — a 30 A circuit running 80 feet in 10 AWG copper will sit near the 3% voltage drop threshold under full load; push past 100 feet and you’re looking at 8 AWG or considering aluminum feeder, which requires antioxidant compound at every termination point and Al-rated lugs. Not optional.
Subpanel work requires correctly sizing the feeder breaker, calculating the panel’s load, and understanding that the neutral and ground bars must remain separate in a subpanel — bonding them is a wiring error that creates parallel neutral paths and a shock hazard.
Tier 4 — Leave It Alone
Main panel replacement, service entrance work, and anything in an active multi-unit building. The issue isn’t just skill. Homeowner’s insurance policies commonly exclude damage caused by unlicensed electrical work, and a panel fire traced to DIY service work can void your coverage entirely. The utility owns the service entrance conductors; touching them without coordination is genuinely dangerous and illegal in virtually every jurisdiction.
Splice connections buried inside walls without accessible junction boxes are also in this category. NEC 300.15 exists for a reason — hidden splices fail, and finding one in a wall cavity during a future renovation ranges from inconvenient to catastrophic.
Self-Assessment Checklist Before Starting Any Wiring Task
Answer these honestly. If you can’t answer yes to most of them, the tier of work you’re considering probably isn’t yours to do.
- Can you read a residential wiring diagram and identify hot, neutral, and ground conductors by color convention?
- Do you own a non-contact voltage tester, and have you actually used it — not just bought it?
- Do you have a multimeter and know how to use the continuity and AC voltage functions?
- Have you confirmed the breaker is off and tested at the device before touching conductors?
- Do you know what box fill calculation means and can you apply it to a 4-inch square box?
- Have you checked your jurisdiction’s permit requirements for the specific task — not just guessed?
- Does your homeowner’s insurance policy cover DIY electrical work, or does it require licensed contractors?
- Can you identify whether your panel has space for a new breaker, and whether it’s a double-tap violation?
- Do you understand how to torque wire terminations to manufacturer spec, particularly on breaker lugs?
- Is there someone who can check your work before you close walls or re-energize the circuit?
That last one is underrated. A second set of eyes — even a knowledgeable friend rather than a professional — catches the reversed wire or missed ground that you stopped seeing after two hours in a tight crawlspace.
Choosing the Right Cable for a Rewire: Conductor Size, Insulation Rating, and Installation Environment
Getting the cable wrong is one of those mistakes that doesn’t announce itself immediately. The circuit works, the breaker doesn’t trip, and everything seems fine — until the insulation starts breaking down inside a wall cavity three years later, or a 40-foot run to the garage drops enough voltage that your workshop tools run hot and wear out prematurely. Cable selection is where physics and code enforcement converge, and it deserves more than a quick trip to the home center to grab whatever’s on the shelf.
Conductor Sizing: Following the Ampacity Tables Without Shortcuts
The foundational reference for US residential work is NEC Table 310.12, which gives ampacity for the copper conductors found in typical NM-B cable installed in a conditioned space. The IEC equivalent — IEC 60364-5-52 — covers international installations and uses mm² cross-sections rather than AWG gauges, but the underlying logic is identical: the conductor must carry the circuit’s maximum continuous load without exceeding its rated temperature.
For day-to-day use, the common pairings hold well:
| Circuit Type | Breaker Rating | US Gauge | Metric Equivalent |
|---|---|---|---|
| General lighting | 15 A | 14 AWG | ~2.5 mm² |
| Small appliance / bath outlets | 20 A | 12 AWG | ~4 mm² |
| Kitchen circuits | 20 A | 12 AWG | ~4 mm² |
| Dryer | 30 A | 10 AWG | ~6 mm² |
| Range / oven | 40–50 A | 8 AWG | ~10 mm² |
| EV charger (Level 2, 48 A) | 60 A | 6 AWG | ~16 mm² |
These assume a short-to-moderate run, normal ambient temperature, and no more than three current-carrying conductors bundled together. Bundle more conductors, run through an unconditioned attic in August, or exceed roughly 100 feet, and the derating factors in NEC 310.15 start to bite.
Voltage Drop: The Problem That Hides Behind a Working Circuit
A circuit can be perfectly code-compliant on paper and still perform poorly. The NEC recommends keeping voltage drop to 3% or less on any branch circuit, with total system drop (feeder plus branch) under 5%. In practice, long runs to detached garages, basement workshops, or outbuildings are the usual culprits.
The simplified formula is:
V_drop = (2 × L × I × R) / 1000
where L is the one-way run length in feet, I is the load current in amps, and R is the resistance of the conductor in ohms per 1,000 feet (roughly 3.14 Ω/1,000 ft for 14 AWG copper, about 1.98 Ω/1,000 ft for 12 AWG).
Say you’re running a 15 A lighting circuit 80 feet to a detached garage. On 14 AWG: V_drop ≈ (2 × 80 × 15 × 3.14) / 1000 ≈ 7.5 V on a 120 V circuit — that’s 6.3%, well over the guideline. Stepping up to 12 AWG brings it to roughly 4.8 V, or about 4%. Still marginal; at 100 feet, you’d want 10 AWG. This is exactly why upsizing the conductor is sometimes the right call even when the breaker size doesn’t require it.
Insulation Types: Matching the Cable to Its Environment
Not all cable jackets and insulation systems are equivalent, and mixing them up is a real source of premature failure.
NM-B (commonly sold as Romex in the US) is rated for 90°C at the conductor but restricted to dry, protected interior locations — inside wall cavities, not in conduit runs through damp crawlspaces. THWN-2 is the workhorse for conduit installations, rated 90°C in both wet and dry locations. In the UK and internationally, SWA (steel wire armored) cable is the standard for outdoor runs, direct burial, and any installation where mechanical protection matters. XLPE (cross-linked polyethylene) insulation handles higher temperatures and is common in commercial and light industrial settings where ambient temperatures near equipment can run well above what standard PVC insulation tolerates.
The failure mode matters here. A 60°C-rated cable operating in an environment that regularly hits 75°C ambient — say, inside a metal conduit on a south-facing exterior wall in a hot climate — doesn’t fail dramatically. It degrades slowly. The insulation becomes brittle, micro-cracks form, and over years the cable becomes a fire risk that a visual inspection won’t catch.
For direct burial, you need cable rated and listed for that purpose — UF-B in the US residential context, or SWA/XLPE with appropriate outer sheath internationally — and burial depth matters. NEC 300.5 specifies minimum cover depths ranging from 6 inches (in conduit) to 24 inches (direct burial, 120/240 V residential), depending on the protection method. UV-exposed outdoor runs require cable with UV-stabilized outer jackets; standard NM-B left exposed to sunlight degrades faster than most people expect, typically within a few seasons in high-UV climates.
Why Manufacturing Quality Is Not a Commodity Question
Here’s where specification and procurement practice diverge from what actually arrives on a job site. A cable marked “12 AWG” or “4 mm²” may or may not have a conductor that genuinely meets IEC 60228 Class 1 or UL 83 dimensional requirements. Underspecified conductor cross-sections — sometimes called “copper clad” or simply undersized in actual cross-section while meeting nominal outer diameter — have been documented repeatedly in budget cable sourcing. The practical consequence is higher resistance, higher heat generation, and ampacity that falls short of what the label implies.
The verification mechanism is third-party certification. UL listing (for the US market) requires periodic factory audits and product testing against published standards — the UL mark on a cable jacket is traceable to an actual test report. Similarly, BS 6004 certification covers UK PVC-insulated cables, and CCC certification applies to cables destined for the Chinese domestic market. CE marking alone is a manufacturer’s self-declaration and carries less weight than a listed, third-party-verified certification.
A UL-listed cable has been independently tested and is subject to periodic factory follow-up inspections by UL.True
UL's certification process includes initial product testing and ongoing factory inspections (called Follow-Up Services), which distinguishes it from self-declared conformity marks.
For residential DIY rewiring, buying listed cable from a reputable distributor is usually sufficient. For larger projects — commercial tenant improvements, multi-unit residential builds, or bulk procurement for construction — sourcing matters considerably more. Manufacturers like Shandong Jinda Special Cable Group, with production certified to international standards and supply chains reaching customers across more than 50 countries, represent the kind of verifiable supply chain that procurement managers need when cable specification, traceability, and volume consistency are all on the line. For a single outlet, buy local. For a full rewire or a bulk construction project, verify the certification, ask for the test reports, and know your source.
The Permit and Inspection Process: How to Pull a Permit, What Inspectors Check, and How to Pass
Most DIYers treat the permit office like a speed trap — something to avoid if you can get away with it. That’s the wrong mental model entirely. The inspection process is, in practice, a free technical review of your work by someone who has seen thousands of installations go wrong. Use it as such.
Why Skipping the Permit Backfires — Sometimes Years Later
Unpermitted electrical work has a way of surfacing at the worst possible moment. In most US states, sellers are legally required to disclose known unpermitted work; in practice, a home inspection often uncovers it anyway when the inspector notices a mismatched panel directory or newer cable stapled in a pattern inconsistent with the home’s age. At that point you’re either renegotiating the sale price or paying a licensed electrician to tear open walls and redo the work under permit — which costs considerably more than doing it right the first time.
The insurance angle is equally serious. If a fire originates in an area where unpermitted wiring was installed, your carrier has grounds to deny the claim. That’s not hypothetical legal boilerplate; it’s a coverage exclusion clause that shows up routinely in post-fire investigations.
In the UK, work notifiable under Part P that was done without either a registered electrician or a building control application creates a problem on the seller’s Property Information Form — buyers’ solicitors increasingly ask specifically about electrical certificates, and an absence raises red flags that can kill a sale or require an Electrical Installation Condition Report at the seller’s expense.
Unpermitted electrical work automatically voids all homeowner's insurance coverage.False
It does not automatically void an entire policy, but most policies exclude claims directly caused by code violations or unpermitted work — particularly fire damage traced to faulty wiring. The practical effect in a worst-case claim can be the same, but the mechanism is exclusion rather than blanket policy cancellation.
How to Actually Apply for a Permit
Start with your local Authority Having Jurisdiction (AHJ) — usually the municipal or county building department. Most now have online portals, though smaller jurisdictions still use paper forms. A typical residential electrical permit application asks for a scope-of-work description (be specific: “replace 12 branch circuits, install 2 new 20 A kitchen circuits, upgrade panel from 100 A to 200 A”), a rough load calculation for any new circuits, and a panel schedule showing available breaker slots. You don’t need stamped engineering drawings for standard residential work in most US jurisdictions.
Fees generally run $50–$250 for residential electrical permits, depending on the municipality and scope. Some jurisdictions charge a flat fee; others calculate based on estimated project value. Either way, it’s not an obstacle — it’s a rounding error relative to material costs.
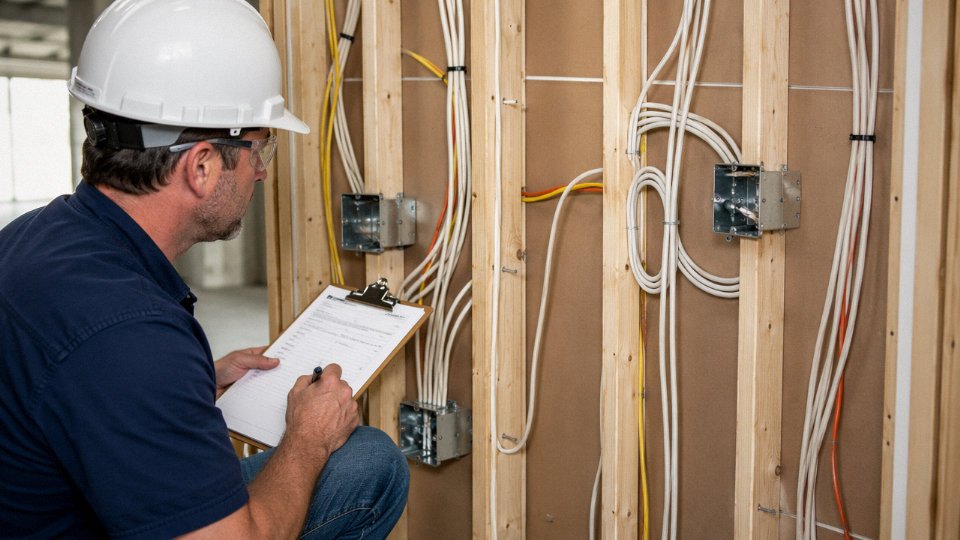
Rough-In Inspection: What Gets Checked Before Walls Close
This is the inspection that actually protects you, because it happens while everything is still visible. Inspectors are specifically looking at:
- Cable stapling intervals — NM cable requires support every 4.5 ft and within 12 inches of every box. A run that sags between joists or lacks a staple near the box is an automatic correction notice.
- Box fill — every conductor, clamp, and device counts toward the cubic-inch limit. An overfilled 14-cubic-inch old-work box with six 12 AWG conductors plus a device is a common failure point that’s easy to calculate in advance but easy to overlook in the field.
- Nail plates — when cable passes through a stud within 1.25 inches of the face, a listed steel nail plate is required. Inspectors probe for this specifically in areas where drywall trades might drive screws.
- Grounding continuity — bare or green ground conductors must be continuous and properly connected at both ends. Floating grounds are a common DIY shortcut that fails immediately.
- AFCI/GFCI identification — inspectors will check that circuits requiring arc-fault protection (bedrooms, and in NEC 2020 jurisdictions, most living spaces) are served by listed AFCI breakers, not standard breakers with a note on the directory.
Final Inspection: Devices Installed, Panel Closed
By final inspection, the inspector is working from a shorter but equally unforgiving checklist. Outlet polarity — verified with a plug-in tester in roughly 30 seconds — catches reversed hot and neutral, which is among the most common DIY wiring errors and one of the most dangerous. GFCI and AFCI trip-test buttons get pressed. The panel directory gets reviewed for accuracy; a blank or obviously wrong label is a red flag that the work was done without attention to detail.
Since NEC 2017, torque requirements on breaker lugs and neutral bar connections are increasingly enforced. Inspectors in jurisdictions that have adopted 2017 or later code may ask to see a torque wrench used on panel connections, or at minimum will look for the torque markings on the panel enclosure and check that connections aren’t visibly under- or over-tightened. If you don’t own a calibrated torque screwdriver, get one before the final — typically $30–$60 at any electrical supply house.
Open knockouts in the panel enclosure are a quick failure. Every unused opening needs a listed filler plate. Inspectors cite this constantly because it’s a direct code violation and a safety hazard.
The Failures That Show Up Most Often — and How to Avoid Them
Reversed polarity at outlets accounts for a disproportionate share of DIY re-inspections. The fix is trivial (swap the hot and neutral at the device), but it requires opening every box you installed and verifying with a tester — so do it before you call for inspection, not after. Missing cable clamps at panel knockouts is another repeat offender; every conductor entering the panel enclosure needs a listed clamp securing the cable jacket, not just the conductors.
Wire nut connections between stranded and solid conductors need to be listed for that application — not every wire nut is. Check the listing on the package. And in any jurisdiction running NEC 2014 or later code, bedroom circuits without AFCI breakers will fail. Full stop. If your panel doesn’t have available slots for AFCI breakers, that’s a planning problem to solve before rough-in, not something to address after the inspector marks the work.
The inspection process isn’t adversarial. Most inspectors will tell you exactly what needs to be corrected and why. That conversation, frankly, is worth more than most online forums.
Cost-Benefit Analysis: When DIY Rewiring Saves Money and When It Creates Expensive Problems
The numbers can look compelling at first glance. A licensed electrician quoting $10,000–$14,000 for a whole-house rewire on a 1,500 sq ft home, when the raw materials — NM-B cable, plastic boxes, receptacles, wire nuts, staples — run maybe $1,800–$2,800 depending on what you buy and where. That gap is real. But the gap is doing a lot of work, and it doesn’t tell the whole story.
Whole-House Rewire: The Full Ledger
Professional quotes in the $8,000–$15,000 range for a typical 1,500 sq ft single-story US home reflect, roughly, 60–100 labor hours at $65–$95/hr depending on your region and market, plus materials marked up 15–40% (contractors buy at trade pricing; you don’t), permit fees, and the electrician’s liability. That markup on materials is worth noting — a 1,000-ft spool of 12 AWG NM-B that runs $180 at a big-box store might cost a contractor $110–$130 through a supply house.
A competent DIYer doing the same project keeps material costs in that $1,500–$3,000 range. Permit fees vary — figure $150–$500 in most jurisdictions. So the theoretical savings look like $5,000–$10,000. In practice, you need to think about 80–120 hours of your own labor. If your time has any real market value, that changes the math. If you’re retired, between jobs, or genuinely enjoy the work, the savings are legitimate.
The risk of a costly mistake is the part people underestimate. Cutting a cable two feet short inside a finished wall — which happens — means either fishing a new run or installing a junction box in an awkward location. A wrong breaker selection or a mismatched wire gauge that fails inspection means tearing open work you thought was done. Budget mentally for a 10–20% “mistake contingency” on a first whole-house project. That’s not pessimism; that’s experience.
Single Circuit Addition: Best DIY ROI
This is where DIY makes the most financial sense, frankly. A licensed electrician adding one dedicated 20 A kitchen circuit — trench from panel, new breaker, new outlet — typically bills $300–$800 all-in depending on run complexity and local rates. A competent DIYer can do the same job for $80–$180 in materials plus the permit. If you already own a fish tape and a multimeter, the return on investment is hard to argue with.
Tool Costs Are Real on a First Project
First-timers often don’t own the basic kit. A decent non-contact voltage tester runs $25–$50 — buy a Fluke or Klein, not a $9 no-name. A fish tape is $35–$80. An oscillating multi-tool for notching studs and drilling tight spaces, $80–$200. Cable staple gun, $30–$60. Multimeter, $40–$100. That’s $200–$600 out of pocket before you pull a single wire, and none of it disappears into the wall — these tools stay with you — but they front-load the cost on a one-time project.
Insurance and Resale: The Unpermitted Work Problem
Unpermitted DIY electrical work can void homeowner's insurance coverage for related losses.True
Many homeowner's insurance policies contain exclusions for losses caused by code-violating or unpermitted work. The specific language varies by insurer and policy, but the risk is real and documented in claim disputes.
Permitted work that passed inspection is, in the eyes of a buyer’s agent and most home inspectors, essentially equivalent to professional work. It’s documented. It was checked. Unpermitted work discovered during a pre-sale inspection is a different situation — expect either a price negotiation, a demand to open walls for inspection, or outright deal complications. The permit fee you skipped to save $200 can cost you $2,000–$5,000 in a sale negotiation.
When Professional Is Simply the Right Call
There are jobs where the economics stop mattering because the technical complexity and legal exposure are too high. Service entrance and panel replacement fall into this category — the utility involvement alone creates liability that most homeowners have no business taking on. Homes with aluminum branch circuit wiring (common in US construction from roughly the mid-1960s through the 1970s) require CO/ALR-rated devices and anti-oxidant compound at every termination; disturbing those connections without knowing what you’re looking at creates a fire hazard, not a savings. Homes built before 1970 with knob-and-tube wiring present a more serious issue still — the insulation on that wiring is often brittle, and disturbing it generates debris that may contain hazardous materials depending on what was applied over decades. An experienced electrician who has dealt with K&T remediation a dozen times is not the same as someone reading about it online for the first time.
In those cases, the $10,000 quote isn’t the wrong answer. It might be the cheap one.
Step-by-Step Workflow for a Compliant DIY Partial Rewire: Planning Through Final Inspection
Most of the mistakes I’ve seen in DIY electrical work happen before anyone picks up a drill — they happen at the planning stage, or rather the lack of one. A partial rewire covering one to three new circuits is genuinely manageable for a careful, methodical homeowner in jurisdictions that permit it, but “manageable” requires working through the steps in order, not improvising.
Step 1 — Load and Capacity Planning
Start at the panel, not the wall. Add up the ampacity ratings on every breaker currently installed — that gives you a rough ceiling check, not a precise load calculation, but it flags obvious problems fast. If you’ve got a 100 A service with 180 A worth of breakers already populated, that alone should prompt a conversation with the utility before you add anything.
For a real calculation, follow NEC Article 220. For a residence, that means applying demand factors to general lighting load (3 VA per square foot), small appliance circuits, laundry, and any fixed appliances. It’s tedious but not complicated, and your AHJ may ask to see it. Verify the panel has open slots — physically, not just ampacity headroom. Some older panels have all slots filled with tandem breakers, which creates its own set of problems.
Step 2 — Material Takeoff and Cable Procurement
Measure every run from panel to first device, device to device, and device to last box. Add 20% for routing around obstacles, and then add another 6–8 inches per termination point for working length. Running short on cable mid-project is the kind of mistake that costs you a half-day and a second permit inspection.
Match the gauge to the circuit: 12 AWG for 20 A kitchen or bath circuits, 14 AWG for 15 A lighting runs, 10 AWG if you’re adding a 30 A circuit for a dryer or water heater. Select cable type for the environment — NM-B in dry, protected interior framing; UF-B if any run exits to a garage slab or exterior. Device boxes need to be sized for fill; a standard 18 cubic inch single-gang box is marginal once you’ve got a receptacle, two 12 AWG conductors, and a ground. Go to 22 cubic inches and avoid the headache.
Breakers are panel-specific. A Square D QO breaker will not fit a Siemens panel safely regardless of what it looks like physically. Buy the correct brand and series for your panel — the panel label will tell you what’s listed for use.
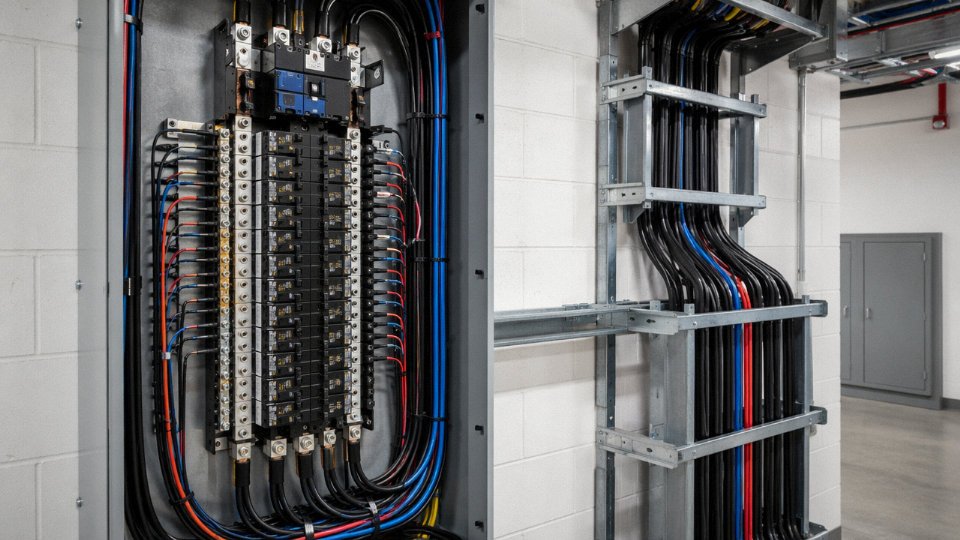
Step 3 — Permit Application and Scheduling
Submit before you touch anything. Most US jurisdictions accept online applications now, and turnaround on residential electrical permits runs anywhere from same-day to about a week depending on the building department’s backlog. Plan your rough-in timing around the inspection window — typically 1 to 5 business days after you call in. If you frame your schedule backward from a hard deadline, build buffer for re-inspection.
Step 4 — Rough-In Execution
De-energize the affected circuits and verify with a non-contact voltage tester before opening any box or entering the panel. If you’re working near the service entrance conductors — the heavy conductors coming in from the top of the panel — stop. Those are not protected by your main breaker and are live even with the main off.
Drill framing members through the center third where possible. Where cable passes through framing within 1¼ inches of the face, install steel nail plates — inspectors check this and it prevents drywall screws from penetrating insulation later. Staple NM-B cable within 12 inches of each box and every 4½ feet along runs. It seems fussy until you see what unsupported cable looks like after a decade.
At the panel, land each conductor to its terminal and torque to spec. The torque value is printed on the breaker or in the installation sheet — somewhere in the range of 35 to 40 in-lb for most residential breakers, but check yours specifically. Under-torqued terminals are a documented fire cause.
Step 5 — Rough-In Inspection and Corrections
Be present. Inspectors will usually walk through quickly and point out issues verbally — if you’re not there, you get a tagged correction notice and no explanation. Take written notes on anything flagged. Most corrections are minor: a missing nail plate, stapling interval too long, a knockout not properly closed. Complete them and call for re-inspection within whatever timeframe your AHJ specifies, which is typically 30 to 180 days depending on jurisdiction.
DIY rough-in electrical work that passes inspection is statistically as safe as professionally installed work of equivalent scope.True
Inspection-based quality control is the mechanism that makes permitted DIY work safe — the permit and inspection process exists precisely to catch installation errors regardless of who does the work. Studies of electrical fire causation consistently point to unpermitted, uninspected work as the risk factor, not DIY status per se.
Step 6 — Device Installation and Final Inspection
Install receptacles, switches, and fixtures after walls are closed. Test polarity on every receptacle with a plug-in tester before energizing — reversed hot and neutral wiring is a common rough-in error and a real shock hazard. Test GFCI devices by pressing the test button and confirming the outlet goes dead; test AFCI breakers per the breaker manufacturer’s procedure.
Label every new breaker in the panel directory clearly and permanently — a penciled label that fades in two years is not useful to the next person who opens that panel. Call for final inspection, walk through with the inspector, and obtain your signed-off permit documentation. Keep it. If you sell the house, that paperwork is what distinguishes compliant work from a liability.
Frequently Asked Questions About DIY Rewiring
Can I rewire my house myself without an electrician?
It depends entirely on where you live — and this is one of those questions where the wrong assumption carries real consequences. In most US states, owner-occupants can legally pull a homeowner permit and perform their own wiring on their primary residence, provided the work passes inspection. You are not allowed to do this on a rental property you own, and some states (Oregon and California among them) have tighter restrictions than others, so check your local AHJ before touching anything.
Outside the US, the picture changes fast. In the UK, Part P of the Building Regulations prohibits most fixed wiring work in kitchens, bathrooms, and outdoors unless you’re a certified electrician or a registered competent person. Swapping a like-for-like outlet in a living room is generally tolerated; running new cable to a bathroom fan is not. Australia is stricter still — every state treats fixed wiring as licensed-electrician-only work, full stop. Most Canadian provinces follow a similar line.
The practical distinction that trips people up: replacing a device (outlet, switch cover) versus actually wiring a circuit. Even in permissive US jurisdictions, you need a permit for the latter.
Do I need to turn off the main breaker to rewire?
Yes — but understand what that actually protects you from, and what it doesn’t. Turning off your main breaker kills power to every branch circuit in the panel. It does not de-energize the service entrance conductors, meaning the two thick wires (or bus lugs) feeding power into the top of your breaker panel from the utility remain live at 120/240 V even with the main breaker off. Touch those and nothing in your panel protects you.
Turning off the main breaker makes the entire electrical panel safe to work in.False
The main breaker disconnects all branch circuits but does not de-energize the service entrance conductors feeding the panel from the utility. Those lugs remain live until the utility physically disconnects the service.
For any work away from the panel — pulling cable through walls, replacing outlets on a specific circuit, adding a junction box — turning off the relevant breaker and confirming with a non-contact tester is sufficient. For work inside the panel itself, you need the main breaker off and you must stay well clear of the service entrance lugs. If your project requires touching anything near those lugs, call the utility to pull the meter. That is not optional.
What gauge wire do I need for a 20-amp circuit?
12 AWG copper, minimum. In metric systems that’s roughly 3.5 mm² cross-section. This is a hard NEC requirement and is mirrored in most equivalent international codes.
Using 14 AWG on a 20 A breaker is a code violation and a genuine fire risk — the breaker is sized to protect the wire, and 14 AWG is only rated for 15 A continuous. The breaker won’t trip until current exceeds 20 A, by which point the undersized wire is already heating up inside your wall where you can’t see it.
How do I know if my house needs a full rewire versus a partial?
No checklist replaces an actual inspection, but certain signs are hard to ignore: breakers that trip under normal loads, outlets that feel warm or smell faintly burnt, lights that flicker without an obvious fixture fault, two-prong ungrounded outlets throughout the house, or visible cloth-wrapped wiring in the attic or basement. A fuse box rather than a breaker panel usually means you’re looking at pre-1960s wiring at the latest.
Knob-and-tube wiring deserves special mention. Insurers increasingly refuse to cover it, and its lack of a ground conductor and degraded insulation make partial patches genuinely problematic — you can’t just splice modern NM-B onto it and call it done.
Get a licensed electrician to do a formal assessment before committing to scope. The inspection cost runs roughly $150–$350 depending on region and house size, and it will tell you whether you’re dealing with an isolated problem or systemic aging.
Can I add a circuit to my panel myself?
In a permitted US jurisdiction, as an owner-occupant, yes. In practice this is one of the more demanding DIY tasks — not because the concept is complicated, but because working inside a live panel (with the main breaker off but service entrance conductors still hot, as noted above) demands real respect for arc-flash risk. Terminal torque matters too; loose connections at breaker lugs cause heat buildup over time. Most residential breaker terminals specify somewhere between 20–35 in-lb of torque — check the breaker’s labeling, because it varies by manufacturer and size.
Use the correct knockout size for your cable clamp, secure the cable within 12 inches of the panel entry per NEC, and don’t daisy-chain grounds onto a single lug if the panel’s ground bar has open positions. These are exactly the things inspectors check.
What is the difference between NM-B, Romex, THWN, and armored cable?
NM-B is the cable type; Romex is a brand name for it, similar to how Kleenex is a brand name for facial tissue. NM-B is for dry, interior, concealed residential wiring — inside finished walls and ceilings where it won’t see moisture or physical abuse. It’s the standard cable for most US residential rewiring work.
THWN (or THWN-2, which carries a higher 90°C wet rating) is a single conductor insulation type, not a cable assembly. You pull it through conduit — EMT, PVC, or flex — and it’s the right choice for exposed runs in a garage, a conduit drop to an outdoor subpanel, or anywhere NM-B would be inappropriate or fail inspection.
Armored cable (MC cable in the US, SWA in UK and international specifications) has a metal sheath providing physical protection. It’s used for exposed runs in unfinished basements, commercial applications, or anywhere the inspector or local code requires protection against physical damage. Choosing the wrong type isn’t just an inspection failure — it’s a durability and safety issue that may not show up for years.
How long does a DIY rewire of one room take?
For someone competent with basic tools but not a professional electrician: adding two new circuits and replacing all existing outlets and switches in a single average-sized room will realistically take 8–16 hours of actual work. That range is wide because it depends heavily on whether the walls are open or finished, how far the panel is, and whether you hit unexpected obstacles like fire blocking or improperly installed old work.
Spread that over a weekend and it’s manageable. A whole-house DIY rewire is a different animal — 4 to 8 weekends is a reasonable estimate for a motivated owner in a 1,200–1,800 sq ft house, and that does not include permit wait times, which can run anywhere from a few days to several weeks depending on your jurisdiction’s inspection backlog. Plan for the longer end if you’re doing this in summer, when building departments in most regions are swamped.
Sourcing Cable for Rewiring Projects: What to Look for in a Supplier and How Bulk Procurement Works
For a homeowner replacing three circuits, cable sourcing is simple — a trip to the electrical supply house, pick the right AWG, done. But for contractors managing a multi-unit renovation, developers rewiring a commercial building, or international buyers procuring cable at volume, the supplier decision carries real project risk. Getting it wrong doesn’t just affect cost per meter. It affects whether your installation passes inspection, how the cable behaves at elevated temperatures over a 30-year service life, and whether the batch you receive in month three actually matches what you tested in month one.
What Separates a Quality Manufacturer from a Commodity Supplier
The most common quality problem in low-cost cable — and this shows up repeatedly in independent lab testing — is conductor cross-section undersize. Cables labeled 2.5 mm² measuring closer to 2.1 or 2.2 mm² on cross-sectional measurement. That’s a 10–15% reduction in current-carrying capacity, which means higher resistive heating under load, accelerated insulation aging, and a circuit that technically passes a continuity test but runs hotter than it should for years. In a single dwelling it’s a nuisance. Across 200 units of a residential development, it’s a liability exposure.
Beyond conductor area, insulation compound quality matters more than most buyers check. Virgin PVC or XLPE compounds hold their dielectric strength over decades; recycled or diluted compounds can lose flexibility and crack at lower temperatures — a problem that shows up after installation, not during acceptance testing. Stranded conductors should have consistent lay length: irregular lay affects both flexibility and the reliability of mechanical terminations. A conductor that looks fine but has inconsistent stranding will work loose from a screw terminal under vibration or thermal cycling faster than a properly manufactured one.
Batch-to-batch consistency is the factor that separates a serious manufacturer from a trader repackaging from multiple sources. On large projects, your first delivery and your sixth delivery need to behave identically. That requires documented process controls, not just a certificate on the first shipment.
Some commodity cable suppliers ship product with conductor cross-sections 10–15% below the stated mm² value, which independent testing has confirmed across multiple market surveys.True
This is documented in product testing conducted by electrical safety organizations and consumer watchdog groups in multiple countries, and is a known issue in price-competitive cable markets, particularly for imported cable without rigorous third-party verification.
Certifications: What They Actually Verify
UL listing (US market) confirms the cable design and manufacturing process have been evaluated against UL standards — usually UL 83 for thermoplastic-insulated wire. It does not guarantee every drum shipped is perfect; it means the manufacturer’s process is audited periodically. CE marking with a declaration of conformity (EU/UK) indicates compliance with relevant directives but is self-declared by the manufacturer for many cable types, so request the supporting test reports against IEC 60228 (conductor dimensions and resistance), IEC 60502 (extruded insulation power cables), or BS 6004/6007 for UK residential applications. CCC certification covers the China domestic market. None of these certifications substitute for factory acceptance test (FAT) reports on your specific order lot. Always require drum-by-drum or lot-specific test data.
How to Specify Cable for a Bulk Order
A proper cable specification — the kind that prevents disputes and failed inspections — should include at minimum:
- Conductor material: copper (electrolytic tough pitch, typically) or aluminum
- Conductor class per IEC 60228: Class 1 (solid) or Class 2 (stranded), which affects installation method and termination hardware
- Conductor cross-section in mm² (metric) or AWG (North American), stated tolerance
- Number of cores and core identification (color code standard — IEC, NEMA, or BS as applicable to destination market)
- Insulation material and temperature rating (70°C PVC, 90°C XLPE, etc.)
- Outer jacket material and any special requirements (UV resistance, low-smoke zero-halogen)
- Voltage rating: 300/500 V or 450/750 V for typical residential branch circuits; 0.6/1 kV for feeders and sub-mains
- Armoring or screening if applicable (SWA for direct burial or mechanical protection)
Jinda’s Manufacturing Capabilities and What That Means for Volume Buyers
Shandong Jinda Special Cable Group operates five production bases across China with roughly 470,000 m² of manufacturing space — which matters operationally because it means production capacity isn’t a bottleneck on mid-to-large orders and that R&D, quality control, and production aren’t fragmented across unrelated facilities. The product range runs from low-voltage residential cable through medium-voltage power cable, which means a contractor or developer can consolidate feeder cable and branch circuit cable procurement with one supplier rather than managing two separate relationships. Jinda exports to 50+ countries, so the logistics infrastructure — documentation, customs compliance, export certification — is already in place rather than being figured out per order.
For contractors and developers, the per-meter economics of cable at volume can shift project margins meaningfully. Buying through distribution adds 20–40% over direct manufacturing price, roughly, depending on volume and product type. The tradeoff is lead time and minimum order quantity.
Lead Times, MOQ, and Logistics
Standard products from a manufacturer’s existing line typically ship in 3–6 weeks from order confirmation, depending on production scheduling and order size. Custom specifications — non-standard conductor cross-sections, special insulation compounds, specific color coding for export markets — add 2–4 weeks for material procurement and production setup, sometimes more for small quantities that don’t justify dedicated production runs.
Minimum order quantities for direct manufacturer procurement usually run in the range of a few hundred kilograms to a full drum or reel depending on product, though this varies. For large projects it’s worth discussing phased delivery: confirm specifications and quality on an initial shipment, then release subsequent lots against the same specification with FAT reports included.
Packaging format affects both shipping cost and site handling. Drums suit large continuous runs — less labor splicing on long cable pulls. Coils or smaller reels suit renovation work where shorter lengths are the norm and storage space is tight. Specify packaging in the purchase order, not as an afterthought, because repackaging at destination is expensive and sometimes damages cable.
One habit worth building into any international cable procurement: require that test certificates reference the specific drum serial numbers in your shipment. Generic certificates that aren’t traceable to your actual product are not meaningfully useful if a problem surfaces after installation.